![]()
![]()
![]()
|
|
|
|
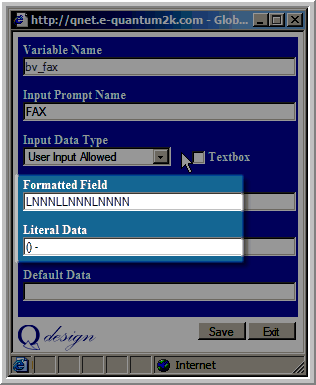
Formatters allow the designer to apply certain formatting restrictions on a variable. When this variable gets assigned to an object in the template designer, the formatting rules are carried over.
For example, an end user can be forced to enter a phone number in the following format, (555) 555-5555. This is achieved by applying formatters and literal data in the respective fields.
The following list displays the formatters that are currently available and their functions:
Formatter |
Description |
|---|---|
x |
Allows a space(' '), any numeric digit ('0' '9'), or any alphabetic character ('a' 'z' or 'A' 'Z') |
X |
Same as the 'x' option except that a lowercase character is automatically converted to uppercase |
y |
Same as the 'x' option except that a uppercase character is automatically converted to lowercase. |
a |
Allows a space(' '), or any alphabetic character ('a' 'z' or 'A' 'Z') |
A |
Same as the 'a' option except that a lowercase character is automatically converted to uppercase |
b |
Same as the 'a' option except that a uppercase character is automatically converted to lowercase. |
v |
Allows a space(' '), any numeric digit ('0' '9'), or any alphabetic character ('a' 'z' or 'A' 'Z')and is variable length. |
V |
Same as the 'v' option except that a lowercase character is automatically converted to uppercase |
w |
Same as the 'v' option except that a uppercase character is automatically converted to lowercase. |
N |
Allows only a numeric digit |
L |
Uses the literal character specified in Literal Data field. |
U |
Same as the 'L' option except the Literal Data will be unprinted on the template. (It will display on the Input Screen.) |
To begin adding variables:
Step 1: Click on the Variables button from the Main Screen.
Step 2: In the Variable Name field, type in a name for the variable.
|
NOTE: For variables which will be used for only a specific template, you may want to make the name descriptive of its characteristics. For example, "Myhar_Title_Required" |
Step 3: In the Input Prompt Name field, type the name that you would like the end user to see when inputting information for this field.
Step 4: Select the Input Data Type.
Step 5: Enter in any desired formatting of this variable.
Step 6: Click Save.
Step 7: Click Exit.
Step 8: Repeat the process to add any new variable that does not yet exist.
Step 9: Once new variables are added you can selectfrom the All Variables List and copy to the Template Variables List.