![]()
![]()
![]()
|
|
|
|
Selecting the Font button, opens the Font Profile window. The designer will pick the fonts that the template will be using. The font profile will be assigned to the individual objects, so if a font is changed in the profile it will affect all objects with that profile. This will allow the designer to quickly view font changes to the template.
The following table describes the font elements and their descriptions.
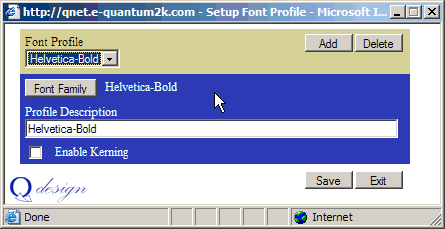
Font Element |
Description |
|---|---|
Font Profile |
Lists all the fonts being used in the current template. |
Add |
Adds a new profile to the font list |
Delete |
Confirms deletion of the current font profile. |
Font Family |
Displays the global font list choices. |
Profile Description |
Defaulted from the font family description. Used to identify the font profile to the designer and will also display in the font profile box |
Enable Kerning |
If checked, Q-design will read the font's kerning data for available fonts. |
To begin adding fonts:
Step 1: From the Main Screen, click Font..
Step 2: The Font Profile window will open. Click Add.
Step 3: Click Font Family.
Step 4: Find your desired font and hit Select
Step 5: The font name will display in the Profile Description. To enter a new description for this font, type it in the Profile Description field.
Step 6: Click on Save.
Step 7: Repeat the process to add all the fonts needed.